前の頁へ 次の頁へ
老い学の捧げ物 PartⅡ
5.ファイル設計
メモ帳アプリでは沢山のメモを管理しなければならないので、メモをファイルに記録する必要があります。kivyでは一般に jsonファイルが使われるので、それに倣いましょう。記録するのは、メモのタイトルとその内容の二項目になります。なおNoteでは、以下のように jsonファイルを入出力しています。
    def save_notes(self):
        with open(self.notes_fn, 'w') as fd:
            json.dump(self.notes.data, fd)

    def load_notes(self):
        if not exists(self.notes_fn):
            return
        with open(self.notes_fn) as fd:
           data = json.load(fd)
        self.notes.data = data
ここで Noteの main.pyを起動し、'fd'をプリントアウトしてみるとこのようになりました。
fd = 'C:\\Users\\user\\AppData\\Roaming\\note\\notes.json'
つまり jsonファイルはシステムに保存されていますが、これではチェックするのに面倒なので main.pyと同じディレクトリに dataフォルダを作成し、それに jsonファイルを保存したいと思います。取り敢えず以下の記述を memos.jsonとして dataフォルダに保存しました。
[
    {"title": "no1", "content": "123456789\n00000001230\n123456000000000000"},

    {"title": "no2", "content": "abcdefg\nhijklmn\nopqrstu\nvwxyz"},

    {"title": "test", "content": "This is a test_memo."},

    {"title": "\u6d88\u53bb\u53ef\u80fd", "content": "\u30c6\u30b9\u30c8\u306a\u306e\u3060"}
]
main.pyに以下のように追加して起動します。
import json    # 今回追加
from kivy.app import App
from kivy.uix.boxlayout import BoxLayout
import urllib.request
from kivy.core.text import LabelBase, DEFAULT_FONT
from kivy.resources import resource_add_path
resource_add_path("font")
LabelBase.register(DEFAULT_FONT, "ipaexg.ttf")

class MyLayout(BoxLayout):
	pass

class MemoApp(App):
    FILENAME="data/notes.json"
    fd = open(FILENAME, mode='r')
    data = json.load(fd)
    fd.close()
    print(data)

if __name__ == '__main__':
	MemoApp().run()
MemoAppクラスに記述したprint(data)文では
 [{'title': 'no1', 'content': '123456789\n00000001230\n123456000000000000'},

 {'title': 'no2', 'content': 'abcdefg\nhijklmn\nopqrstu\nvwxyz'},

 {'title': 'test', 'content': 'This is a test_memo.'},

 {'title': '消去可能', 'content': 'テストなの だ'}]
と表示されました。Gは print文で表示されたものをコピペして jsonファイルとしたら、json.decoder.JSONDecodeErrorと怒られました。 jsonファイルでは、[']は使えず["]を使うそうです。
ここで Noteに倣ってファイルの形式を決めておきます。Noteには Screenを継承した Notesクラスがあり、そこに def _get_data_for_widgets(self)メソッドが定義されています。目的とするメモアプリでは、メモ記入画面と、メモ一覧画面があり、画面遷移処理が必要になります。ScreenManagerを使うことになりますから、この際に Screenとともに必要なモジュールも importしておきましょう。画面遷移は SlideTransitionで行います。import文は次のようになります。
from kivy.uix.screenmanager import ScreenManager, Screen, SlideTransition
ScreenManagerを使うことに変更したので、まずメモ記入画面である MyLayoutクラスの名前を Screenを継承したMemoView(Screen)に変更しておきます。
6.メモ一覧画面
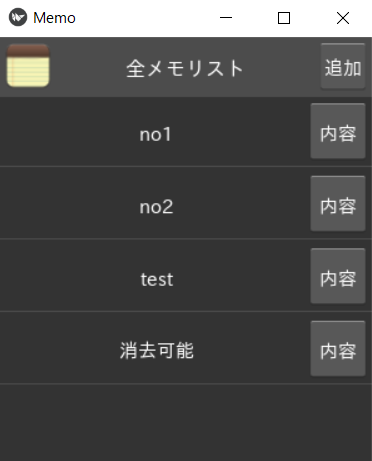
次に、メモ一覧画面を作りましょう。下の画像のような画面にしたいと思います。「追加」ボタンを押すと初期のメモ記入画面に遷移し、新しいメモを入力できます。メモ内容を見たいときには、例えばタイトル名が no1の「内容」ボタンを押せば、no1のメモ内容が表示されたメモ記入画面に遷移します。
つまり最上段にはアイコン画像が表示された Label、「全メモリスト」と表示された Label、「追加」と表示された Buttonが水平方向に並んで配置され、その下段に全てのメモリストが表示されています。各メモリストは、「タイトル名」が表示された Labelと、「内容」と表示された Buttonとからなります。したがって main.pyには、全メモリストのクラスと各メモリストのクラスを作ることになります。
各メモリストは、BoxLayoutを継承させてクラス名を "MemoListItem(BoxLayout)"とします。memo_index, memo_content, memo_titleの三つを要素としますが、今は passとだけ記します。
全メモリストはメモ一覧画面を決定するので、クラス名を "AllMemoView"とし、Screenを継承させて Noteの Notesクラスに倣い以下のように作成しました。全メモリストの dataはリストとして扱うので ListPropertyを規定しています。リストの要素は各メモリストです。 dataを取得する get_data()メソッドを作成し、get_data()メソッドで得られた dataは AliasPropertyと規定され、dataAllMemosとして kvファイルに渡されます。
class AllMemoView(Screen):
    data = ListProperty()
    def get_data(self):
        return [{
            'note_index': index,
            'note_content': item['content'],
            'note_title': item['title']}
            for index, item in enumerate(self.data)]
    dataAllMemos = AliasProperty(get_data, bind=['data'])
MemoAppクラスに buildメソッドと jsonファイルを読み込むメソッドを作成し、main.pyは以下のようになりました。
import json
from kivy.app import App
from kivy.uix.screenmanager import ScreenManager, Screen, SlideTransition
from kivy.properties import ListProperty, AliasProperty
from kivy.uix.boxlayout import BoxLayout

import urllib.request
from kivy.core.text import LabelBase, DEFAULT_FONT
from kivy.resources import resource_add_path
resource_add_path("font")
LabelBase.register(DEFAULT_FONT, "ipaexg.ttf")

class MemoView(Screen):
    pass

class MemoListItem(BoxLayout):
    pass

class AllMemoView(Screen):
    data = ListProperty()

    def get_data(self):
        return [{
            'note_index': index,
            'note_content': item['content'],
            'note_title': item['title']}
            for index, item in enumerate(self.data)]

    dataAllMemos = AliasProperty(get_data, bind=['data'])

class MemoApp(App):
    FILENAME="data/notes.json"

    def build(self):
        self.notes = AllMemoView(name='notes')
        self.load_notes()
        self.transition = SlideTransition(duration=.35)
        root = ScreenManager(transition=self.transition)
        root.add_widget(self.notes)
        return root

    def load_notes(self):
        fd = open(self.FILENAME, mode='r')
        data = json.load(fd)
        fd.close()
        self.notes.data = data

if __name__ == '__main__':
    MemoApp().run()
作成したクラスのウィジェットを kvファイルに規定します。<Screen>:では二つの画面の背景色を定義しています。<NoteView>:ではメモ記入画面のウィジェット配置を定義しています。<NoteListItem>:では各メモリストのウィジェット配置を定義しています。<AllMemoView>:ではメモ一覧画面のウィジェット配置を定義し、RecycleViewを使っています。
以前の kivyには ListViewというのがあって、Dustiy Phillips氏の著書「Creating Apps in Kivy」でもその使用が推奨されていました。しかし ListViewは kivy1.10 で廃止されてしまい、RecycleViewを使ってね、ということになりましたが、Gにはその使い方がよくわかりませんでした。Noteの使い方は非常に参考になります。なお、今はイベントに関する記述を全て省略しています。
memo.kvです。
<Screen>:
    canvas:
        Color:
            rgb: .2, .2, .2
        Rectangle:
            size: self.size

<NoteView>:
    BoxLayout:
        orientation: 'vertical'

        BoxLayout:
            orientation: 'horizontal'
            size_hint_y: None
            height: '48dp'
            padding: '2dp'

            canvas:
                Color:
                    rgb: 0, 1, 0
                Rectangle:
                    pos: self.pos
                    size: self.size

            Button:
                text: 'リスト'
                size_hint_x: None
                width: self.height

            TextInput:
                id: text_box
                text: root.note_title
                font_size: '16sp'
                multiline: False
                hint_text: 'タイトル'

            Button:
                text: '消去'
                size_hint_x: None
                width: self.height

        TextInput:
            id: text_box_2
            font_size: '16sp'
            multiline: True
            hint_text: 'メモ内容'
            background_color: .8,.8,.9,1
            text: root.note_content

<NoteListItem>:
    height: '48sp'
    size_hint_y: None

    canvas:
        Color:
            rgb: .3, .3, .3
        Rectangle:
            pos: self.pos
            size: self.width, 1

    BoxLayout:
        padding: '5dp'

        Label:
            text: root.note_title

        Button:
            text: '内容'
            size_hint_x: None
            width: self.height

<AllMemoView>:
    BoxLayout:
        orientation: 'vertical'

        BoxLayout:
            orientation: 'horizontal'
            size_hint_y: None
            height: '48dp'
            padding: '5dp'

            canvas:
                Color:
                    rgb: .3, .3, .3
                Rectangle:
                    pos: self.pos
                    size: self.size

            Image:
                source: 'data/icon.png'
                mipmap: True
                size_hint_x: None
                width: self.height

            Label:
                text: '全メモリスト'
                font_size: '16sp'

            Button:
                text: '追加'
                size_hint_x: None
                width: self.height

        RecycleView:
            data: root.dataAllMemos
            viewclass:
            RecycleBoxLayout:
                default_size: None, dp(56)
                default_size_hint: 1, None
                size_hint_y: None
                height: self.minimum_height
                orientation: 'vertical'
                spacing: dp(2)
 icon.png
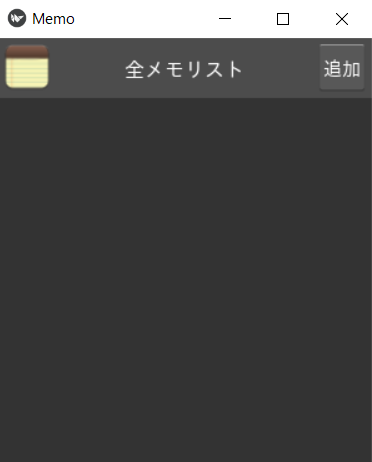
fontフォルダのあるフォルダにdataフォルダを作成します。dataフォルダにこのicon.pngを保存し、main.pyを起動すると下の画面が表示されます。今は、追加ボタンを押しても何も変化はありません。
前のページへ 次のページへ